Who said snow has to be white?? (ok, ok... please hold your yellow snow comments...)
Snow can be a rainbow of colors! Fill up a few squirt bottles with water dyed with food coloring or liquid watercolor paint (be sure it is non-toxic!) and send your children out to liven up your yard!
Squirters can write their names in the snow, make a painting on snowplow mounds or add colorful details to a snowman. What fun!
Makin' a Stink!
During a recent "nature treasure hunt" with preschoolers here at Cantigny, the youngsters scampered around the prairie and trees surrounding our beautiful new Education Center, happily picking up leaves, bark, nuts and petals to fill their bags. They ran up and down the paths around the building- darting in to the grass when something caught their eye. They covered most of the ground around the building, all the while giving a wide berth to the row of ginkgo trees.
While intrigued by the cool fan shaped leaves and the height of these great trees, they all acknowledged the same fact..."These trees STINK!", and avoided them like the plague.
"It smells like puke over here!", "Peeew!" and "UGH! What is THAT smell?" were shouted as the treasure hunters passed the ginkgoes.
The short, 4 year old friendly, answer is "The smell comes from the seeds of the ginkgo tree. They have a strong smell don't they? (smile)"
These seeds, affectionately called "stink balls" or "puke balls", are not only scattered outside the Education Center, put also across a staff parking lot in the park. I have to laugh as I look out my window and see that NO cars are parked in the three spots nearest the ginkgo tree. It only takes driving over the seeds once, and getting them stuck in your tire treads- or heaven forbid, stepping on them- and driving home with the smell of vomit in your car to realize you shouldn't park near the tree in October!
BUT, each fall, I also observe park visitors gathering up these horridly stinky seeds! WHY??!! I couldn't image why anyone would want a bag full of stink, so I did some investigation. Knowledge is power.
Ginkgo seeds contain butanoic acid (also known as butyric acid) which is also found in butter, Parmesan cheese and well...puke. Who's hungry! :} The smell really lets loose once the seeds have fallen...and especially when they have been run over by novice parkers.
Okay...so now we know why they smell. WHY do people want them??
The seeds are actually a traditional Chinese food. (Ginkgo is the national tree of China!) Ginkgo nuts (the hard part inside the stinky seed coat) are used in many dishes, and are often served at special occasions. In Chinese culture, they are believed to have health benefits, and even aphrodisiac qualities. (ugh.) The fleshly seed coat is not recommended for eating due to ginkgotoxins which can cause seizures. Yikes!
I know I had heard of ginkgo being used as a memory enhancer- you've seen those ginkgo biloba pills in health food stores etc right? Well, those attributes mainly come from extracts from the LEAVES- not the seeds. There is a LOT of info out there about ginkgoes being used for medicinal purposes, so I have included this fact sheet from the Department of Health to give you the basics.
So, stinky story short....yep, it DOES smell like puke by this tree. But, stand upwind and just appreciate the tree for it's natural beauty. And, if you are so inclined, pull on some gloves (please), pick up a few seeds and explore them yourself.
While intrigued by the cool fan shaped leaves and the height of these great trees, they all acknowledged the same fact..."These trees STINK!", and avoided them like the plague.
"It smells like puke over here!", "Peeew!" and "UGH! What is THAT smell?" were shouted as the treasure hunters passed the ginkgoes.
The short, 4 year old friendly, answer is "The smell comes from the seeds of the ginkgo tree. They have a strong smell don't they? (smile)"
These seeds, affectionately called "stink balls" or "puke balls", are not only scattered outside the Education Center, put also across a staff parking lot in the park. I have to laugh as I look out my window and see that NO cars are parked in the three spots nearest the ginkgo tree. It only takes driving over the seeds once, and getting them stuck in your tire treads- or heaven forbid, stepping on them- and driving home with the smell of vomit in your car to realize you shouldn't park near the tree in October!
BUT, each fall, I also observe park visitors gathering up these horridly stinky seeds! WHY??!! I couldn't image why anyone would want a bag full of stink, so I did some investigation. Knowledge is power.
Ginkgo seeds contain butanoic acid (also known as butyric acid) which is also found in butter, Parmesan cheese and well...puke. Who's hungry! :} The smell really lets loose once the seeds have fallen...and especially when they have been run over by novice parkers.
Okay...so now we know why they smell. WHY do people want them??
The seeds are actually a traditional Chinese food. (Ginkgo is the national tree of China!) Ginkgo nuts (the hard part inside the stinky seed coat) are used in many dishes, and are often served at special occasions. In Chinese culture, they are believed to have health benefits, and even aphrodisiac qualities. (ugh.) The fleshly seed coat is not recommended for eating due to ginkgotoxins which can cause seizures. Yikes!
I know I had heard of ginkgo being used as a memory enhancer- you've seen those ginkgo biloba pills in health food stores etc right? Well, those attributes mainly come from extracts from the LEAVES- not the seeds. There is a LOT of info out there about ginkgoes being used for medicinal purposes, so I have included this
So, stinky story short....yep, it DOES smell like puke by this tree. But, stand upwind and just appreciate the tree for it's natural beauty. And, if you are so inclined, pull on some gloves (please), pick up a few seeds and explore them yourself.
September 22
Delicious autumn! My very soul is wedded to it, and if I were a bird I would fly about the earth seeking the successive autumns. ~George Eliot
Happy First Day of Autumn!
Float Your Boat
All the rain we've had this summer left plenty of puddles.....which I find are good for a handful of things.
A. Stomping in. Obviously.
B. Stomping in hard enough to splash your brother, sister, mom, or dad.
C. Heroically saving a drowning worms life. You'll feel good about yourself all day if you fish those guys out and drop them safely in the grass- I guarantee it.
D. Floating handmade boats.
This summer I somewhat mastered the art of paper boat making during Cantigny's Wild Wednesday program. And when I say mastered, I mean I can make three basic kinds of boats, I am not an origami guru by any means. Please don't ask to see an intricate flower, or crane, or gorilla.
But these three boats, look out- I've got them down!
My favorite- the canoe- is illustrated step by step below. By the time you scroll to the last picture you too will be a nautically themed origami wizard....at least when it comes to little paper canoes. And with a little patience (on your part) and a little practice (on their part) your children will be folding and sailing boats by bath time!
So, grab a square of colored paper- the bigger the better for your first try ( I recommend using actual origami paper that is colored on one side) and start to scroll...
Start with your paper colored side up.
Fold it in half.
Fold it in half again, to create a square.
Unfold the entire paper so that you have a windowpane of creases.
Fold in one side to meet the center line. Repeat on the other side.
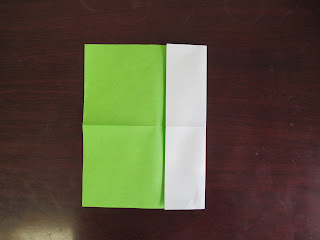
Fold up each corner to meet the middle line.
Fold each edge up to the middle line to form shallow a triangle. It is okay if they overlap in the middle.
Fold the top and bottom points in to the middle line.
Pinch the boat in half so that you see the colored paper through the center line.
Carefully turn the boat inside out so that the color is on the outside. Slowly shape the folds into the general boat shape.
To make the folds crisper and to help your boat stand up, refold the colored edges back down and press the boat flat. At this point, your children can also add some details- crayons work best as they will not run when wet.
Pop your boat back up, shape it and take it sailing! (I advise adding a tow line in case your little boat sails out of arms reach.) Don't leave your canoe in the water too long or the water will soak through the paper and capsize your vessel.
It's also fun to craft little boats out of natural materials. Collect nutshells, pinecones, sticks, leaves and flowers with your children then piece together a fleet of rafts, sailboats and cruisers. Half the fun is the sink or float test when you first set them in the water!
As Mark Twain put it, “Twenty years from now you will be more disappointed by the things that you didn't do than by the ones you did do. So throw off the bowlines. Sail away from the safe harbor. Catch the trade winds in your sails. Explore. Dream. Discover.”
So go, grab your kids and set sail.
A. Stomping in. Obviously.
B. Stomping in hard enough to splash your brother, sister, mom, or dad.
C. Heroically saving a drowning worms life. You'll feel good about yourself all day if you fish those guys out and drop them safely in the grass- I guarantee it.
D. Floating handmade boats.
This summer I somewhat mastered the art of paper boat making during Cantigny's Wild Wednesday program. And when I say mastered, I mean I can make three basic kinds of boats, I am not an origami guru by any means. Please don't ask to see an intricate flower, or crane, or gorilla.
But these three boats, look out- I've got them down!
My favorite- the canoe- is illustrated step by step below. By the time you scroll to the last picture you too will be a nautically themed origami wizard....at least when it comes to little paper canoes. And with a little patience (on your part) and a little practice (on their part) your children will be folding and sailing boats by bath time!
So, grab a square of colored paper- the bigger the better for your first try ( I recommend using actual origami paper that is colored on one side) and start to scroll...
Start with your paper colored side up.
Fold it in half.
Fold it in half again, to create a square.
Unfold the entire paper so that you have a windowpane of creases.
Fold in one side to meet the center line. Repeat on the other side.
Fold up each corner to meet the middle line.
Fold each edge up to the middle line to form shallow a triangle. It is okay if they overlap in the middle.
Fold the top and bottom points in to the middle line.
Pinch the boat in half so that you see the colored paper through the center line.
Carefully turn the boat inside out so that the color is on the outside. Slowly shape the folds into the general boat shape.
To make the folds crisper and to help your boat stand up, refold the colored edges back down and press the boat flat. At this point, your children can also add some details- crayons work best as they will not run when wet.
Pop your boat back up, shape it and take it sailing! (I advise adding a tow line in case your little boat sails out of arms reach.) Don't leave your canoe in the water too long or the water will soak through the paper and capsize your vessel.
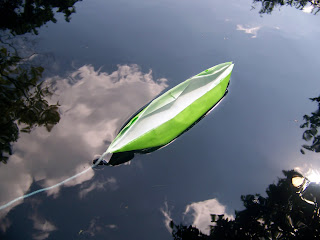
It's also fun to craft little boats out of natural materials. Collect nutshells, pinecones, sticks, leaves and flowers with your children then piece together a fleet of rafts, sailboats and cruisers. Half the fun is the sink or float test when you first set them in the water!
As Mark Twain put it, “Twenty years from now you will be more disappointed by the things that you didn't do than by the ones you did do. So throw off the bowlines. Sail away from the safe harbor. Catch the trade winds in your sails. Explore. Dream. Discover.”
So go, grab your kids and set sail.
Confession
Not sure how to start this one....but I've been reminded that blogging is about sharing real life events, and being honest about what happens during those events.
So, I'll just lay it out there (gulp)...I killed Phil.
I feel awful and am so ashamed! It was a total accident! He was temporarily left in my car....on a 90+ degree day...and well, was steamed.
It was quite a traumatic discovery once I had the "oh no!" moment of realizing he was still in my car.
So, I'm off "class pets" for now. (by the way, if Phil's death wasn't enough- before he passed, the three harvester ants I fed him from the ant farm, attacked him. Yep- full blown attack. His weekend babysitter was kind enough to intervene, but not before Phil lost a portion of his tail. Poor, poor Phil.)
So, I will definitely not be having any more live creatures in my office.
So, I'll just lay it out there (gulp)...I killed Phil.
I feel awful and am so ashamed! It was a total accident! He was temporarily left in my car....on a 90+ degree day...and well, was steamed.
It was quite a traumatic discovery once I had the "oh no!" moment of realizing he was still in my car.
So, I'm off "class pets" for now. (by the way, if Phil's death wasn't enough- before he passed, the three harvester ants I fed him from the ant farm, attacked him. Yep- full blown attack. His weekend babysitter was kind enough to intervene, but not before Phil lost a portion of his tail. Poor, poor Phil.)
So, I will definitely not be having any more live creatures in my office.
We've Got Ourselves a Stowaway!
A few days ago I prepared a fish bowl with a few rocks, some mud, a couple of plants and water for the pair of frogs I was planning to catch to show to the preschool aged children for this week's pond themed storytime program- Sprouts.
The idea was to walk along one of Cantigny's creek beds and scoop up a few hoppers into my handy dandy coffee can turned frog net. I would just keep the frogs for a day or two, to show the Sprouts.
Well, out with the frogs and in with the baby lizard! Yep- a lizard! And not one that I caught along Cantigny's creek beds. This tiny one rode to Cantigny in a philodendron plant and was delivered to our greenhouse. Luckily, he was spotted and after a game of chase, was captured in a jelly jar.
Knowing that I was preparing for frogs, the horticulture department called me up and offered me their stowaway.
My frog habitat is now home to the only and only, Phil. Named after the plant he got a free ride to Illinois on. And thanks to a bit of Internet sleuthing, I believe he (err..I guess, he could be a she?)is a Brown Anole. He is about two inches long from nose to tail and is a tanny brown color, although I think his skin is able to change colors a bit as it has been varied shades of brown.
Brown Anole's are common in Florida and, pretty much unheard of in Illinois. They eat mainly insects and can grow to be about 5-8 inches long.
For the time being, I have him in our fish bowl and am trying to tempt him with whatver little insects I can find, and catch. But, so far he has turned his nose up at the millipedes and worms I've offered.
So, I hate to admit it, but today I dropped the three remaining ants from my ant farm (see June's posts) in with Phil.
I expected a feeding frenzy, but actually, I think poor little Phil is actually scared of the ants! He runs away from them when they come near him and hides behind the plants. I hope to catch a few smaller ants and maybe a roly poly or two to get him through the weekend.
I'll post an update next week!
Feelin Hot, Hot, Hot
Ok, so I picked the coolest day this week to write this...so maybe stop reading now and come back tomorrow when it is supposed to be 93 degrees and uber humid...it will be much more inspirational then.
I mean it...seriously, stop reading and go play outside in this 80-something degree cool wave. I'll meetcha back here tomorrow.
Hello again old friend. (pretend it's tomorrow) Phew! It is steamy out there isn't it? What a change from yesterday. But- good thing you came by today- prepare yourself, after you read through this short list of fun things to do outside on a hot day you won't be able to stop yourself from grabbing all the kids you know, slathering them with SPF and dragging them out of the air conditioning.
So, without further ado...
Top 20 Things to Do Outside on a Hot Day
20. Go swimming- be it pool, pond, creek or ocean or in my case- the plastic baby pool in my backyard, if I can get my son to scootch over
19. Fly a kite.
18. Play shadow tag by stepping on eachother's shadows.
17. Eat a popsicle. Save packing materials and make your own pops by inserting a craft stick into a cup of juice and leaving it in the freezer for a few hours.
16. Go creek walking.
15. Make sun tea by putting a few tea bags into a large glass jar of water and leaving the jar out in the sun for a few hours. Enjoy over ice with honey or sugar added or a fruit or mint garnish. Ooo la la!
14. Make sunprints. Sign your children up for our Sunpainted T's class on August 3rd and they can make an awesome back to school t-shirt with the sun's help! To register,click here.
13. Have a watermelon seed spitting contest or play "Greased Watermelon"- rub margarine, butter or shortening all over a watermelon then toss it in the pool or lake and let everyone try to catch it- and hold onto it!
12. Blow bubbles. Make your own bubble juice with dishsoap and water...some say add a little sugar, corn syrup or glycerin (avaiable at pharmacies) to make longer lasting strong bubbles.
11. Chase bugs.
10. Tie-dye with berry juice. Blend up fresh or frozen berries to a watery smoothie consistency then dip white or light colored clothing in! Allow to dry flat in the sun then machine wash on own in cold water.
9. Build a fort.
8. Paint yourself...with washable paints, mud, or even pudding- then hose off!
7. Go on a picnic.
6. Watch the clouds.
5. Play a classic outdoor game like Hide and Seek, Sardines or Ghosts in the Graveyard.
4. Read outside. I suggest doing so in a hammock if you have one.
3. Build boat out of natural items and launch it in a nearby puddle, pond or creek. Try this for free during Wild Wednesday- July 14 and August 11- from 1-3 pm at Cantigny!
2. Hug a tree and enjoy it's cool shade.
1. Go to Cantigny!
I mean it...seriously, stop reading and go play outside in this 80-something degree cool wave. I'll meetcha back here tomorrow.
Hello again old friend. (pretend it's tomorrow) Phew! It is steamy out there isn't it? What a change from yesterday. But- good thing you came by today- prepare yourself, after you read through this short list of fun things to do outside on a hot day you won't be able to stop yourself from grabbing all the kids you know, slathering them with SPF and dragging them out of the air conditioning.
So, without further ado...
Top 20 Things to Do Outside on a Hot Day
20. Go swimming- be it pool, pond, creek or ocean or in my case- the plastic baby pool in my backyard, if I can get my son to scootch over
19. Fly a kite.
18. Play shadow tag by stepping on eachother's shadows.
17. Eat a popsicle. Save packing materials and make your own pops by inserting a craft stick into a cup of juice and leaving it in the freezer for a few hours.
16. Go creek walking.
15. Make sun tea by putting a few tea bags into a large glass jar of water and leaving the jar out in the sun for a few hours. Enjoy over ice with honey or sugar added or a fruit or mint garnish. Ooo la la!
14. Make sunprints. Sign your children up for our Sunpainted T's class on August 3rd and they can make an awesome back to school t-shirt with the sun's help! To register,click
12. Blow bubbles. Make your own bubble juice with dishsoap and water...some say add a little sugar, corn syrup or glycerin (avaiable at pharmacies) to make longer lasting strong bubbles.
11. Chase bugs.
10. Tie-dye with berry juice. Blend up fresh or frozen berries to a watery smoothie consistency then dip white or light colored clothing in! Allow to dry flat in the sun then machine wash on own in cold water.
9. Build a fort.
8. Paint yourself...with washable paints, mud, or even pudding- then hose off!
7. Go on a picnic.
6. Watch the clouds.
5. Play a classic outdoor game like Hide and Seek, Sardines or Ghosts in the Graveyard.
4. Read outside. I suggest doing so in a hammock if you have one.
3. Build boat out of natural items and launch it in a nearby puddle, pond or creek. Try this for free during Wild Wednesday- July 14 and August 11- from 1-3 pm at Cantigny!
2. Hug a tree and enjoy it's cool shade.
1. Go to Cantigny!
Eat Dirt
"To dig and delve in nice clean dirt can do a mortal little hurt."
- John Kendrick Bangs
Finally, proof that playing in the dirt is good for you. Apparently some of the bacteria found in dirt has antidepressent qualities and can increase learning! Mud pies anyone?
To read just a snippet about these findings, click this Link
To read some solid research, click this Link and download Health Benefits to Children From Contact With the Outdoors and Nature.
- John Kendrick Bangs
Finally, proof that playing in the dirt is good for you. Apparently some of the bacteria found in dirt has antidepressent qualities and can increase learning! Mud pies anyone?
To read just a snippet about these findings, click this
To read some solid research, click this
Easy-Peasy DIY Ant Crafts
I almost went with the standard, and admittedly cute, egg carton ant with pipecleaner legs and antennae craft for our crawling insect theme story time, but I decide to take inspiration from my awesome ant farm and have the children create simple paper ant mazes, and while we were at it, stamp some ants on their pants!
Anthill Maze
Supplies: paper (copy paper works best, but construction paper is fine), two markers of the same size, tape, a paper clip, a magnet, a craft stick (or a fridge magnet in lieu of a small magnet and craft stick) glue, and a picture of an ant (clip art or hand-drawn)
1. Tape the markers together
2. Pressing down with both markers, draw a "maze" on the paper- squiggles, straight lines, loop-de-loops...it's up to you!
3. Glue the small magnet to one end of a craft stick- or just use a fridge magnet. Tape a paper clip to the back of your ant picture. Thread the tape through one loop of the paperclip so the other loop of metal is left uncovered.
4. Have a buddy hold the paper at the edges with both hands. Lay the ant picture at the "start" of your maze and hold the magnet under the paper directly underneath the ant- then slowly move the magnet and slide your ant through the maze!
Change the picture and you have a whole new adventure- a mouse looking for cheese, a race car on a track, a groundhog or prairie dog tunneling....the possibilities are endless!
Ants in My Pants
Supplies: paper, scissors, cotton swabs, tape, and an ink pad
1. Cut your paper to resemble a pair of pants. Tape three cotton swabs together so the tips line up- and create the three body parts of an ant (head, thorax, abdomen) . To get the most use out of this you can then cut the sticks in half so you have two "ants" from each grouping.
2. Dab the cotton swab bundle onto the ink pad, then stamp onto the paper pants. You may need to practice a bit to get a solid ant form- sometimes kind of tilting the swabs from side to side while on the paper helps to round out the shape. Keep stamping until you think you have enough ants in your pants!
I Heart Ants
I can't help it- I am totally obsessed with these insects! I even stopped myself from doing the ant stomp when I found an anthill in my yard this weekend.
The ant farm is going swimmingly- the ants haven't stopped tunneling and now they cruise through their labyrinth with ease. I am sad to say that we have lost a few along the way. (moment of silence please) The deceased have all been carried out of the tunnels and laid on the surface. When I am 100% sure they are dead and not just in a reeeaaaalllly deep sleep, I will respectfully remove them and lay them to rest outside. Welcome to the food chain...lunch is served birdies!
The whole purpose of buying and...what is the right word?...raising?...hosting?...creating?, this ant farm...hmm. Well,the whole reason I got this ant farm was to have a real-life example to show young children during Cantigny's Sprouts program- a nature based story time we offer each month.
This month's theme was Gone Buggy! The first week we talked about bug bodies and what separates bugs from insects (true insects must have two antennae, six legs, three body parts, and an exoskeleton- wings are optional), the second week we explored insects that fly and this past week we discussed insects that crawl and hop- including the wonderful, amazing, ever-popular ANT.
The children (ages 3-5) were captivated by the ant farm and loved watching the ants crawl through the tunnels! They were quite curious and inquisitive. The most popular question was, "Can they get out?"
Observing the ants provided a great opportunity for music and movement- we hopped like grasshoppers, flapped our wings like butterflies and crawled on all fours- much like our six legged friends. Then, after marching with maracas to the classic "Ants Go Marching" tune, we worked on two simple ant crafts that you can try at home! I will explain them- with pics- in the next post.
I'll leave you with something else to try at home- my favorite insect song! It's to the tune of Head, Shoulders, Knees and Toes.
Head, thorax, abdomen, abdomen
Two antennae, six legs and sometimes wings,
Head, thorax, abdomen, abdomen
There are optional movements-
-Point to head, chest and tummy- repeat
-Make antennae by holding up one pointer finger on each side of your head (sort of like bull horns)
-Hold up three fingers on each side of your body and put your hands at hip level to show your "six legs"
-Do the standard thumb in the armpit chicken wing OR arms out to the side airplane style
-Point to head, chest and tummy- repeat
Sing and move faster and faster and faster until you are all giggling and out of breath and dancing like- well, what else? Like you've got ants in your pants!
I've Got Ants in My Pants!
Okay, so not really in my pants, that seems quite uncomfortable, but they are in my office. No worries- not a pest control issue- they are happily enclosed in an ant farm. And let me just tell you- they are the COOLEST little insects!
I ordered my six-legged friends a few weeks ago- a vial of hearty Harvester Ants- flown in from the wilds of St. Charles, Missouri- shipped with a cold pack and best wishes. To my utter dismay (and later, my morbid curiosity- paired with a magnifying glass) ALL the ants arrived DOA! Good old Illinois summer heat got to my ants before they got to me.
So, I filled out the replacement ant order form (I guess DOA ants are apparently a pretty common occurrence in the insect livestock industry- poor things) and a few days later, a second vial was delivered -to my home address this time, to be sure I got them unpacked ASAP. This time half lived! Woo hoo!
So, I poured my 18 living pets- and the bits and pieces of their deceased friends (ugh) into my shiny new Antworks ant farm. And watched. And waited. And watched. And waited. And then real life took over and I gave my son a bath and put him to bed. When I checked back in on my roommates, the industrious lil' critters had been quite busy. The first task was to move all the dead ants to one side- just pile em up. An ant can move up to 50 times their own weight, so they just tossed the unlucky ones on their backs and stacked them up.
Once the cemetery was established they got right to work digging tunnels. Have you ever seen an ant dig a tunnel?? SOOOO COOL. First off- I should clarify, these ants are not in your run of the mill sandy ant farm- oh no- these ants are tunneling through special blue gel created by NASA for in orbit ant habitat studies.
The gel contains nutrients, so as the ants tunnel, they are ingesting the "juice" from the gel. Ant fact: Ants do not "eat" food, or at least they don't really chew and swallow food. They squeeze their food and ingest just the liquid. Ant fact 2: Their jaws go sideways like scissors, not up and down like ours. I'm on a roll....Ant fact 3: Ants have two tummies- one for themselves and one to bring food to other ants. (How that food exchange works, I'm not sure, and I'd rather not ponder it too deeply.)
So back to the farm....the ants use their crazy scissor-style mandibles to tunnel and as they break off pieces of the gel to create the tunnel, they carry them up and out of the tunnel, and start to create piles. That is why you always see anthills made of little bits of dirt along sidewalks and driveways- that all came out of the tunnels.
By the time I woke up the next morning and checked on my worker bees...er....ants, they had created quite the little homestead for themselves. Oh did I mention, all the ants are FEMALE? (Ant fact 4) All the ants in this farm, and actually almost all the ants you find outside, are female! Male ants are created as needed for reproduction, and die shortly there after. Not sure how all the social dynamics and hierarchies work in the world of ants, but this all girl band of ants sure can tunnel...check it out...
A Perfect Summer Day
I was greeted this morning by a very large dragonfly tapping on my office window. It hovered there just long enough for me to get a close look at it's blue face and watch it's helicopter wings vibrate.
Ahhh...to be a dragonfly! What a perfect summer day to flit and float and fly around!
After so many days of that weather that shall not be named, it is a treat to see BLUE sky!
Come to Cantigny this afternoon and enjoy it with me! Today at 1:00 we are hosting the first Wild Wednesday of the summer. Stop the presses, we are making paper!
We will use shredded newspaper and bits of plant material to craft circles of handmade paper. This is a hands-on experience geared towards children ages 3-10. And yahoo!- it's free to all park visitors- once you've paid the $5 parking fee, that is.
We'll be outside the new Outdoor Education Center...see you there! Just follow the dragonflies!
In case you don't trust insects to give you accurate directions...Cantigny is located at 1 S 151 Winfield Road, in Wheaton, Illinois.
Are you ready?
Are you ready?
Are you ready?
OK!
OK!
Did I forget to mention this was a repeat after me song?
I still have the tune of "Goin' on a Bug Hunt" in my head from our preschool storytime last week, and the chorus ends with asking if the children are ready. But the question is, are YOU ready? Ready for a playdate with nature?
This blog is your personal invitation from nature to COME OUT AND PLAY!
As an educator at Cantigny I get to go out and play just about every day. I can take a hike through the wooded nooks of the park, stroll in the prairie, or literally stop and smell the roses in our beautiful Rose Garden.
There are logs to balance across, ponds to search for fish, turtles and frogs, gardens to explore and plenty of big green lawns to run across or just lay down on.
When was the last time you- and your children- just laid down in the grass and watched the clouds roll past you? Or simply closed your eyes and listened?
Can't remember? Well, how about starting this weekend. Go outside and play. At Cantigny, at the park, or just in your own backyard.
Get back to the basics. Watch the clouds, follow an ant, smell a flower. Play tag, play catch...just play.
This blog will be your spot to get some inspiration and motivation to accept each day's invitation to a playdate with nature. No RSVPs required.
Are you ready?
Are you ready?
OK!
OK!
Did I forget to mention this was a repeat after me song?
I still have the tune of "Goin' on a Bug Hunt" in my head from our preschool storytime last week, and the chorus ends with asking if the children are ready. But the question is, are YOU ready? Ready for a playdate with nature?
This blog is your personal invitation from nature to COME OUT AND PLAY!
As an educator at Cantigny I get to go out and play just about every day. I can take a hike through the wooded nooks of the park, stroll in the prairie, or literally stop and smell the roses in our beautiful Rose Garden.
There are logs to balance across, ponds to search for fish, turtles and frogs, gardens to explore and plenty of big green lawns to run across or just lay down on.
When was the last time you- and your children- just laid down in the grass and watched the clouds roll past you? Or simply closed your eyes and listened?
Can't remember? Well, how about starting this weekend. Go outside and play. At Cantigny, at the park, or just in your own backyard.
Get back to the basics. Watch the clouds, follow an ant, smell a flower. Play tag, play catch...just play.
This blog will be your spot to get some inspiration and motivation to accept each day's invitation to a playdate with nature. No RSVPs required.
Are you ready?
Subscribe to:
Posts (Atom)
About Me
- Education Staff, Cantigny
- Wheaton, Illinois, United States